Underworld Gang Wars - Hotspot Design
- Guilherme Martins

- Mar 5
- 6 min read
Role: Senior Level Designer
Tools: Unreal 5, Maya
Studio: Mayhem Studios
IP: Underworld Gang Wars (UGW)
Gender: Battle Royale
Platform: Mobile
Explanation of Design Concept
1.1 Overview: This level represents the core hotspot area of an open world map, built around an industrial complex with war gangster atmosphere. The goal is to create a high-intensity combat zone that blends verticality, traversal risk, and layered combat readability within a chaotic yet readable environment. So, a risk-reward combat zone.

1.2 The level supports:
● Mid to long-range engagements across highlighted spots
● Close-quarters combat inside warehouse and factory building interiors
● Vertical overwatch via outpost, platform, and stacked containers
● Rotational flank routes
● Car routes
● Low, mid, and high cover spots
● Green area soft cover (Trees and grass)
Target Player Experience:
This Hotspot is designed as a high-intensity combat zone where squads rotate after early loot and begin contesting power positions. Therefore, it targets skilled players who already have basic weaponry and can exploit hotspots like this, which present high risk and high reward. As a result, multiple encounters with other players are expected.
The experience is built around:
● Vertical Pressure (Players must constantly evaluate elevation threats, from highlighted spots that favor mid and long shooters.
● Controlled Exposure Windows (Sightlines are long but segmented. No single sniper angle dominates the entire yard. Open cargo lanes create tension. Interior warehouse compressions reset pacing.)
● Traversal Risk & Reward (From the metric validation. 3.0m jump range defines safe commitment gaps. 0.8m-1.0m box creates combat rhythm shifts. 2.5m container height enables full-cover peek dynamics. 4m industrial gates allow vehicle entry, creating aggressive push potential. Movement decisions are tactical.)
● Combat Layering (The space operates on three gameplay layers: Ground Layer - Vehicle-accessible cargo yard, 12m roads for high-speed engagements. Fast-paced movement from one point to another, or stealth exploration/ambush. Mid Layer - Warehouse/ Buildings interiors (Close Quarters Battle pressure - CQB pressure), Gate-controlled entry points. High Layer - High-level spots, drop-down ambush opportunities
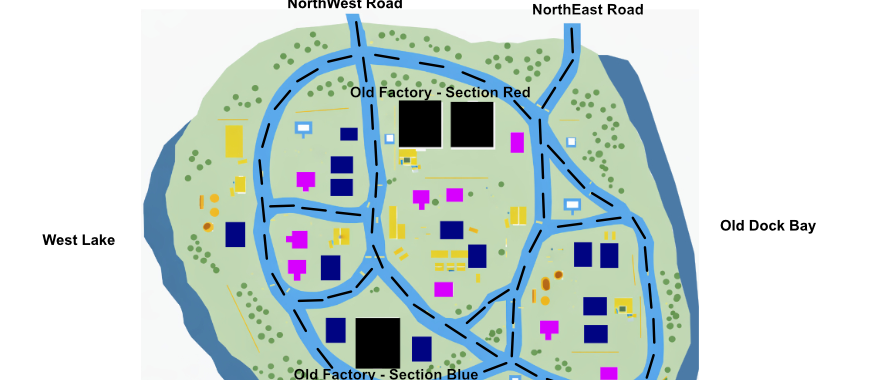
1.3 Spatial Structure on the Island
Being located on a peninsula island core. This increases encounter probability without artificial chokepoints.
● Lake and Hill edges act as natural hard boundaries.
● Green areas and fences are a kind of Gate dividing the hotspot from other areas.
● Rotations are funneled organically. Three main car routes.
● The Hotspot becomes a strategic mid-map anchor

1.4 Design Philosophy
Core Principle: Controlled Combat Density
The hotspot is designed around intentional combat clustering, not random player collision.
In the Battle Royale structure, hotspots must:
● Attract rotations naturally
● Sustain multi-squad combat
● Avoid single-angle dominance
● Support re-engagement after disengagement This level applies Spatial Hierarchy and Readability, Elevation Layering, Sightline Segmentation, Flow Segmentation, and Compression vs Expansion to achieve the Level balance.
1.4.1 Spatial Hierarchy and Readability
Spatial hierarchy is the intentional organization of masses, heights, and volumes to create immediate visual clarity and gameplay meaning.
The environment uses a clear height and mass hierarchy:
● 3m/4m structures: tactical blockers
● 6m structures: mid-tier dominance
● 8m/+ structures: landmark anchors This hierarchy creates:
● Recognizable skyline silhouettes
● Immediate power position identification
● Clear risk assessment for players entering the Hotspot
1.4.2 Elevation layering
Elevation layering distributes gameplay across multiple vertical tiers instead of relying on flat layouts. So… Elevation/Vertical layering increases decision-making complexity and prevents two-dimensional combat. Verticality is introduced with counterplay in mind, not dominance.
Applied techniques:
● Elevated platforms lack full 360° cover.
● Container stacks create partial high-ground control, not full-zone visibility.
● Drop-down routes allow aggressive repositioning but reduce escape options.
Every high ground position must:
● Offer an advantage.
● Create exposure.
● Allow contest routes. This avoids untouchable sniper towers.

1.4.3 Sightline Segmentation
Sightline segmentation is the controlled interruption of long visual corridors to prevent oppressive dominance. Segmented sightlines maintain tension without enabling unchecked long-range control.
Instead of open-field dominance, the yard/ open area uses controlled sightline breaks.
Technique applied:
● 2.5m container modules create peek-based engagements.
● 4m wall blocks interrupt long sniper corridors.
● Road width (12m) allows vehicles but does not enable full lateral dominance. Result create: ● Engagements are layered.
● Mid-range fights occur in pockets.
● Players must reposition to maintain advantage.
1.4.4 Flow Segmentation
Flow segmentation divides movement routes into primary, secondary, and tertiary paths to avoid linearity and choke stagnation. A well-segmented hotspot sustains combat without collapsing into a single choke.
Hotspots fail when they become dead ends.
This Hotspot includes:
Primary Flow
● Vehicle-accessible 12m road axis (three main routes)
Secondary Flow
● 6m side roads
● Gate-controlled transitions
Tertiary Flow
● Tight compression routes
● Vertical shortcuts
This layered flow structure allows:
● Push
● Reposition
● Reset
● Third-party (new squad/ team) entry
1.4.5 Compression vs Expansion
Compression and expansion define pacing rhythm through spatial contrast. This rhythm is critical in hotspots where pacing must feel dynamic but readable. Prevents pacing stagnation and encourages tactical decision-making:
Expansion Zones
● Open cargo yard
● Road-facing entrances
Compression Zones
● Warehouse interiors
● Gate passages
● Container corridors
The transition between open and tight spaces: Open - Tight - Open
My goal in using these techniques is to work together to achieve:
● Combat clarity under chaos
● Tactical vertical decision-making
● Sustainable multi-squad engagement
● Fairness through spatial structure
Design Standers Table
2.1 Metric Lab Overview
Before developing the hotspot layout, I established a dedicated Metric Lab, a controlled testing environment used to define, validate, and stress-test all gameplay-critical dimensions. The Metric Lab eliminates guesswork by validating the scale before full layout implementation.
In this Level Design, the Metric Lab functions as:
● A dimensional benchmark space
● A traversal validation zone
● A combat readability testing ground
● A vehicle clearance verification area Rather than designing the hotspot based on visual approximation, all core dimensions were first tested against player scale, movement speed, and combat scenarios.
2.2 Standard Dimensions
2.2.1 Cover Heights
● 0.5m: soft step transition
● 0.8m/1.0m: partial combat elevation
● 2.5m: full standing cover (container standard)

Purpose:
To define safe peek heights and prevent ambiguous exposure states.
2.2.2 Jump & Traversal Limits
● 3.0m maximum safe jump distance
● Platform heights from 0.5m to 1.0m

Purpose:
To calibrate traversal commitment vs exposure risk.
2.2.3 Wall & Structure Hierarchy
● 3m / 4m / 6m / 8m + height system

Purpose:
To establish readable skyline dominance and power position layering. The hierarchy ensures that players can visually identify threat levels at a distance.
2.2.4 Gate & Vehicle Clearance
● 4m height industrial gates
● 3.25m dual-panel vehicle entry
● 12m primary road
● 6m secondary road

Purpose:
To balance car accessibility without allowing dominance in compression zones.
2.2.5 Environmental Readability
Vegetation heights (2.5m/5m) were tested to:
● Avoid accidental hard cover
● Break sightlines without blocking combat clarity
● Maintain third-person visibility integrity

After validation, these tested values became the official Design Standards used throughout the hotspot. All structures, containers, walls, and traversal elements follow these established dimensions to maintain consistency and combat integrity.
Level Layout Plan
3.1 Mental Map
The Mental Map technique is an early-stage level design approach where the spatial structure of a level is first defined conceptually and volumetrically, rather than through detailed 2D drafting.
Instead of investing time in a polished floor plan that will inevitably be iterated, the designer establishes:
● Core gameplay anchors
● Spatial hierarchy
● Flow relationships
● Vertical layering logic Before committing to a refined 2D layout. This approach prioritizes gameplay structure over graphic precision.
3.2 Iterative Process
A quick overview is: the method of improving a level through repeated cycles of testing, evaluation, and modification.
Instead of trying to produce a perfect layout from the start, the level evolves through multiple blockout revisions where gameplay behavior is observed and adjusted.
The goal of iteration is to ensure that the final layout is based on tested player experience rather than initial assumptions.
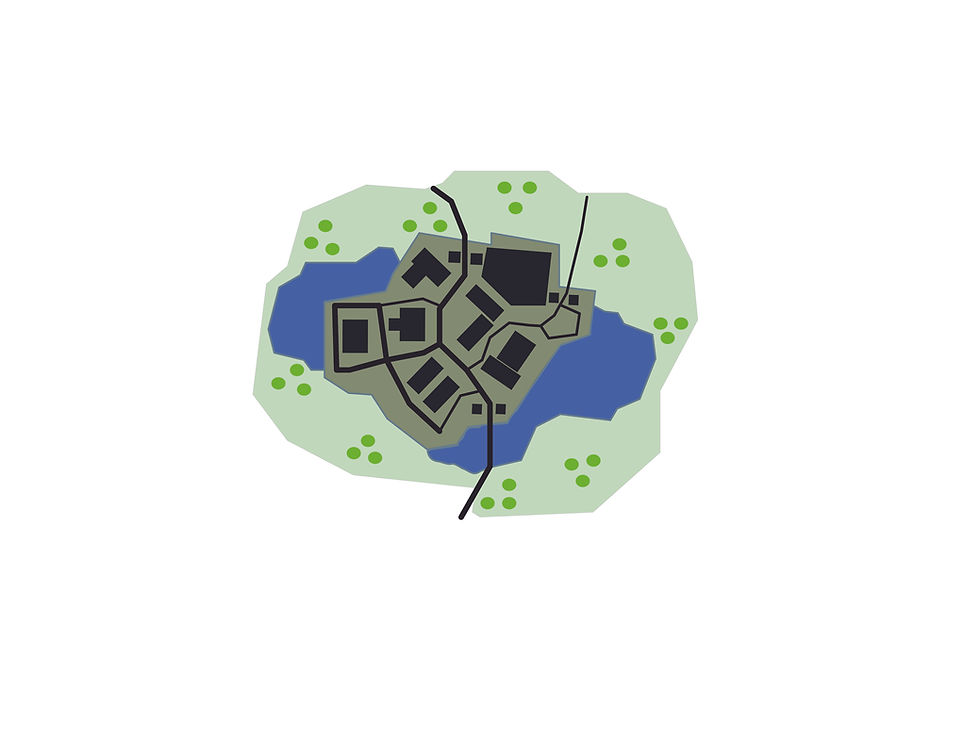
The initial Mental Map was structured around a single large factory complex acting as the dominant structure within the hotspot.
The goal of this approach was to create a strong visual landmark and a centralized combat attractor. The large building concentrated vertical gameplay and interior combat into one primary location, while the surrounding cargo yard functioned as the exterior combat space.
However, the early blockout evaluation raises a red flag (design shortcoming):
● Combat density became overly centralized.
● Multiple squads could converge on the same interior space too quickly.
● The building dominated the hotspot occupancy.
● Rotational variety was limited.
● The hotspot risked becoming a single POI environment rather than a layered combat space.
So my approach to solve this problem was: During iteration, the large factory was divided into three separate industrial buildings, with one structure repositioned to the opposite side of the yard.
This adjustment created a triangular spatial distribution across the hotspot.
The iterative process delivered:
● Balance player occupancy across multiple structures
● Create distinct micro-POIs inside the hotspot
● Reduce interior congestion
● Improve rotation options
● Support multi-squad engagements
Instead of a single dominant structure, the hotspot now supports parallel engagements across different buildings. This iteration reinforced an important principle:
Hotspots should distribute combat and high-risk, high-reward. Do not compress it into a single POI structure.
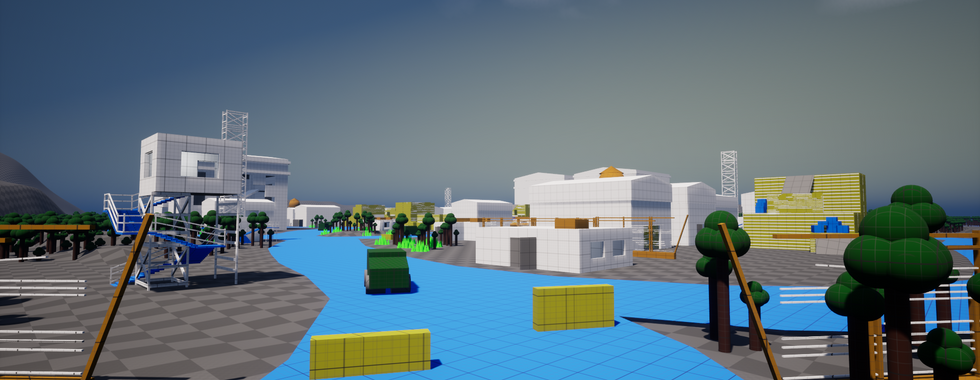
3.3 Final Layout